


A Guide to creating Web Applications with React and Redux

In a previous article, I tried to write an in-depth guide to getting started with Progressive Web Apps. Having learnt a great deal since then, along with noticing some changes in the tools that I used, I decided to write something between a follow-up and a rewrite of that guide. Much like last time, I will be adding a TL;DR in every section to help you figure out what parts of the article you want to read.
If you haven’t read my previous article on PWAs, I strongly recommend you read it first, before proceeding.
React, CSS Frameworks and JSON files
Last time, I started from scratch, explaining where to get sample data, as well as why tools like React and a CSS framework are useful for a project like this. We are still going to be using my pet project, mini.css, for styling, along with React, but we will also be adding Redux to the mix. Apart from that, we will also be creating our own JSON files for our PWA, using JSONbin.io, instead of getting data from some API. That way we will be able to create a custom data structure that suits our needs and simulates the process of designing the endpoint of an API.
One of the key points with React in this article is that we don’t need to write our own Service Workers, like we did before. Nowadays, create-react-app provides us with a prebuilt service worker implementation, which auto-updates when anything is changed, allowing us to create PWAs a lot faster and easier.
Apart from that, I will be introducing you to Redux, which is pretty hot for many reasons, mainly because it allows you to globally manage state and it’s supposed to be perfect for scaling your applications. For this specific project, it might be a bit of an overkill, but it’s always nice to experiment with new tools.
TL;DR: React now supports service workers out-of-the-box, allowing for easier PWA creation. Redux is invaluable for managing state globally, as well as scaling our apps.
Defining a data structure
Last time, we used a couple of RESTful JSON APIs to grab data to serve to our users. This time around, we will be doing something slightly different by defining our own data structure and storing it online, so that our PWA can access it. We want to create a simple application that resembles a blog in structure, so we want to be defining a data structure resembling blog posts. Here’s what a JSON object for a post should probably contain:
- ID: a value that can uniquely identify a post
- Title: a string representation of the post’s title
- Image: a link to the featured image for the post
- Author: a string with the post author’s name
- Tags: a list of strings containing keywords about the post
- Content: the string representation of the actual contents of the post
- Date added: a representation of the date when the post was added
Based on the above structure, I used a Lorem Ipsum Generator and some wonderful images from Unsplash to create a sample JSON file with 25 posts. You can have a look at it here — remember the definition of the JSON objects is very important, as it will determine the structure of our page to some extent.
TL;DR: The definition of a data structure is a good first step to determine the application’s content and start building it. JSON is an ideal format to use for simulating an API’s response.
Creating the application shell

The first step to building a PWA is to create an application shell. To accomplish this, I will be using mini.css, along with some custom CSS to make it look a little bit more polished. As this is a simple blog application, I will use a <header> element to add a nice top bar with a logo and a button for a drawer, along with a search field (more on that later). In addition to that, I want to add a list of posts, inside the .drawer. This list will be a responsive menu that will be hidden by default on mobile.
create-react-app autumn-pwa
cd autumn-pwa
npm install --save redux react-redux
npm start
Before we get to designing the application shell, we need to create a project. Provided you have installed create-react-app globally, you should get your project up and running just by running the instructions above. While the project folder is being created, head over to mini.css’s repository and grab the latest version of your flavor of choice.
I’m not going to go in-depth about customizing the CSS, as it’s beyond the scope of this article and it’s also well-documented in the framework’s website, but you can play around with it to create an application shell that is to your liking. After getting everything up and running, my App component looks like this:
| import React, { Component } from 'react'; | |
| import './App.css'; | |
| class App extends Component { | |
| render() { | |
| return ( | |
| <div className="App"> | |
| <header className="sticky"> | |
| <label htmlFor="drawer-checkbox" className="button drawer-toggle hidden-desktop"></label> | |
| <span href="#" className="logo">Autumn Blog</span> | |
| <svg xmlns="http://www.w3.org/2000/svg" width="24" height="24" viewBox="0 0 24 24" fill="none" stroke="currentColor" strokeWidth="2" strokeLinecap="round" strokeLinejoin="round" className="feather feather-search"><circle cx="10.5" cy="10.5" r="7.5"></circle><line x1="21" y1="21" x2="15.8" y2="15.8"></line></svg> | |
| <input type="search" className="searchBox"/> | |
| </header> | |
| <div className="row"> | |
| <input type="checkbox" id="drawer-checkbox" /> | |
| <div className="drawer"> | |
| <label htmlFor="drawer-checkbox" className="button drawer-toggle hide"></label> | |
| <div className="post-link-container"> | |
| <!-- Add links for posts here --> | |
| </div> | |
| </div> | |
| <div className="col-sm-12 col-md content"> | |
| <!-- Add actual posts here --> | |
| </div> | |
| </div> | |
| </div> | |
| ); | |
| } | |
| } |
As you might have noticed, our application shell is missing the list of links and the posts. Both of these will be created dynamically from the data we will fetch from our JSON file in the next couple of steps.
TL;DR: Every application needs an application shell, which contains the basic UI. The application shell can be a couple of empty containers, that will be dynamically populated with data later on.
Connecting Redux
So far we haven’t done anything extremely different since last time, but it’s time we got started with something new, namely Redux. Redux allows us to manage our application’s state globally, making it significantly easier to scale and alter it at will. This specific application might not give you a convincing reason to use it, but it’s a cool tool and you will most likely need it somewhere down the road. Worst-case scenario is you will just know how to use another tool you might need soon.
So, how does Redux work in combination with React? It’s reasonably simple really, but the things that happen behind the scenes can confuse you at first. Redux uses a global store for the application’s state, which you can interact with by sending actions. Actions are the only way to interact with your store and you use action creators to create actions. This might sound complicated, so let me show you an example:
| // Best practice dictates specifying constants | |
| // for the different types of actions in an application | |
| export const SEARCH_POST = 'SEARCH_POST'; | |
| // This is an action creator | |
| export const searchPost = (query) => { | |
| // The returned object is an action | |
| return { | |
| // 'type' is a required field for an action, | |
| // specifying the type of action being performed | |
| type: SEARCH_POST, | |
| query | |
| } | |
| } |
Reading the comments in the code above should help you make sense of what an action and what an action creator is. With that out of the way, we need to talk about one last, yet very important piece of Redux — reducers. Simply put, a reducer is a function that is told what type of action is being performed (along with any parameters that are in the action’s payload), and its job is to change the application’s state accordingly. The reducer is a pure function that takes the last state and an action and returns the next state. Most of the time, you will see a reducer have a switch statement with a case corresponding to each action.
Right, so now that we know how Redux works, let’s write some code. We want our application to have two actions, one for viewing all posts in the blog and one for searching for posts based on a specific query. The code I presented above is the action creator for the search functionality, so it should be pretty obvious how you can create an action creator to view all the posts (hint: there is no payload except for the type of the action).
Next up, we should create our reducer, which is currently a mostly empty switch statement, that should look something like this:
| const posts = (state = [], action) => { | |
| let posts = []; | |
| switch(action.type){ | |
| case VIEW_ALL: | |
| // TODO: Return all posts | |
| return posts; | |
| case SEARCH_POST: | |
| // TODO: Return posts matched in search | |
| return posts; | |
| default: | |
| return state; | |
| } | |
| } |
Finally, we have to connect() our App component to the Redux storage and mapStateToProps() so that the component is passed the right props. Then, we will wrap our <App /> component inside a <Provider>and set the provider’s store to createStore(reducer) where reducer refers to the reducer we just created.
| // React and other imports... | |
| import { connect } from 'react-redux'; | |
| import { viewAll, searchPost } from './actions'; | |
| class App extends Component { | |
| // Code for our App component... | |
| } | |
| // Mapping state to props | |
| function mapStateToProps(state){ | |
| return { | |
| posts: state | |
| } | |
| } | |
| // Connecting the App component | |
| export default connect(mapStateToProps, { viewAll, searchPost })(App); |
| // React and other imports... | |
| import App from './App'; | |
| import { Provider } from 'react-redux'; | |
| import { createStore } from 'redux'; | |
| import reducer from './reducers'; | |
| import registerServiceWorker from './registerServiceWorker'; | |
| // Creating a store | |
| const store = createStore(reducer); | |
| // Wrapping our app inside a provider | |
| ReactDOM.render( | |
| <Provider store={store}> | |
| <App /> | |
| </Provider>, | |
| document.getElementById('root')); | |
| registerServiceWorker(); |
TL;DR: Redux helps us manage the state of our applications. It uses actions and action creators to interact with the store. Reducers are pure functions that are given the previous state and an action and they return the next state. To utilize Redux, we need to connect our application to its store and wrap our App component inside a Provider.
Fetching initial data
In the previous article, I showed you a way to fetch data from an API using AJAX. This time around, we will be using fetch() and Javascript Promises to get the data for our application.
I could write a lot about promises and how they work, but I’m sure there are tons of other articles that explain them better than I do, so I’m just going to explain what you need to know. When you call a function like fetch(), the result might take a little while to be returned or it might not even be returned at all. In the first scenario, you use .then() to deal with the result and, in the second scenario, you use .catch() to deal with an error.
In our case, we trust that the API is good and it won’t return an error (it shouldn’t anyways, if we provide the right URL), so we will omit the .catch() part and work with .then(). fetch() needs to be provided with a URL and then we can chain one or more .then() calls that will be resolved as soon as the response comes back.
Running asynchronous code like this is pretty complicated from Redux, so we will use the alternative, which is manipulating the state of our App component, as soon as it mounts. Therefore, we will write something like this in our App’s componentDidMount() method:
| componentDidMount(){ | |
| fetch("https://jsonbin.io/b/59f721644ef213575c9f6531") | |
| .then( response => response.json()) | |
| .then( data => { this.setState({posts: data})}); | |
| } |
Having loaded our initial data, it should be pretty easy to populate that navigation list, as well as the list of posts to show all the data we just loaded from our JSON file. I assume you are familiar with HTML and React, so you can easily do this on your own.
TL;DR:
fetch()is a method we can use to grab data from our JSON file (or API) and it returns a Javascript Promise. Promises are used to run code asynchronously, so we can utilize them to load data without having to wait for the data to render our application.
Moving state to Redux
One key thing about Redux is that it uses props instead of state to pass data to components. This is something I struggled with at first, so I intentionally let you store the data we got from the JSON file into the local state of our App component, in order to explain how a project with local state can benefit from Redux, if you take the time to make the necessary changes. By now your render() method should have a part for rendering posts and links to them that looks like this:
| let posts = '', postLinks = ''; | |
| if(this.state.posts && this.state.posts.data){ | |
| posts = this.state.posts.data.map(post => {return <Post post={post} key={"post_"+post.id}/>;}); | |
| postLinks = this.state.posts.data.map(post => {return <a href={"#"+post.id} key={"post_link_"+post.id} className="button">{post.title}</a>}) | |
| } |
However, you want your application’s state to be managed by Redux, instead. So, the first thing you have to do is simply change this.state to this.props. As soon as you do that, you will start getting errors, but bear with me for a couple of minutes and you’ll be good to go. Instead of copying the JSON data to the local state, we need to pass it to Redux’s store. How do we do this? Using an action! I’m going to go ahead and define a new action, then add it to the reducer, then tell it to store the retrieved data to the global state. Finally, I will alter the componentWillMount method to dispatch that action, so that everything works like it did before. This is what I ended up with:
| // Import necessary packages... | |
| class App extends Component { | |
| // Constructor and methods... | |
| // Mounting the component causes an action | |
| componentDidMount(){ | |
| fetch("https://jsonbin.io/b/59f721644ef213575c9f6531") | |
| .then( response => response.json()) | |
| .then( data => { | |
| let posts = { | |
| data: data | |
| }; | |
| this.updatePosts(posts); | |
| }); | |
| } | |
| // render() -> Remember to change this.state to this.props | |
| } | |
| // mapStateToProps and connect as before |
| // Import necessary packages... | |
| const posts = (state = {data: []}, action) => { | |
| let posts = {data: []}; | |
| switch(action.type){ | |
| case VIEW_ALL: | |
| // TODO: Return all posts | |
| return posts; | |
| case SEARCH_POST: | |
| // TODO: Return posts matched in search | |
| return posts; | |
| case UPDATE_POSTS: | |
| // Copy data from the action to the global state | |
| Object.assign(posts.data, action.posts.data); | |
| return posts; | |
| default: | |
| return state; | |
| } | |
| } | |
| export default posts; |
TL;DR: Redux interacts with components’
props, notstate. Moving from local to global state is pretty easy to do and makes sure that you handle everything using Redux. Asynchronous calls, like.fetch()can utilize actions to interact with the globalstore, as necessary.
Adding search functionality
Search is functionality that is most often expected in any kind of application. There are many ways to implement searching, but for this PWA, I will be using JS Search, a pretty efficient search library, that is quite easy to use. Go ahead and install it, using:
npm install js-search
As with any tool, you should take a moment to read the README and understand how it works. Based on the instructions provided, it should be pretty easy to create an instance of the search library, sort by date, add indexes to title, tags and author and set the document collection to the list of posts.
| const posts = (state = {data: [], selected: []}, action) => { | |
| let posts = {data: [], selected: []}; | |
| switch(action.type){ | |
| case VIEW_ALL: | |
| Object.assign(posts.data, state.data); | |
| posts.selected = []; | |
| return posts; | |
| case SEARCH_POST: | |
| Object.assign(posts.data, state.data); | |
| let search = new JsSearch.Search('date-added'); | |
| search.addIndex('title'); | |
| search.addIndex('tags'); | |
| search.addIndex('author'); | |
| search.addDocuments(posts.data); | |
| posts.selected = search.search(action.query).map(searchResult => searchResult.id); | |
| return posts; | |
| case UPDATE_POSTS: | |
| Object.assign(posts.data, action.posts.data); | |
| return posts; | |
| default: | |
| return state; | |
| } | |
| } |
To actually choose which posts to display, we will be using an array of the posts’ ids, so go ahead and add this to your reducer’s definitions, as well as your App component’s constructor. You should also update your rendering conditions for posts and links to show only selected posts if the selected array is non-empty, otherwise show all posts.
Finally, we need to hook up an onChange event for our search field, so that we can dispatch actions to the reducer. If the field is empty, we will empty the selected posts list, otherwise we will utilize JS Search to find which posts match our query.
| <input type="search" className="searchBox" onChange={event => { | |
| if(event.currentTarget.value) this.searchPost(event.currentTarget.value); | |
| else this.viewAll(); | |
| }}/> |
TL;DR: Client-side search can be easily implemented with the JS Search library and it only requires adding a little bit of logic to our Redux reducer, along with an event handler for a search field.
Optimizing the build
Our little PWA is complete and we didn’t even have to worry about writing a Service Worker, as create-react-app handled that for us. There is a slight problem though, which is our final build’s size. Running npm run build will reveal how heavy our PWA is. For me the .js file alone is a whooping 168KB. That’s pretty heavy for a tiny blog application like this, so imagine what the size can be for a pretty big website.
Optimizing the size of a PWA might seem unnecessary. After all the code is cached by the service worker the first time, then it’s served from the cache. Technically, that is true, but what if our application updates on a regular basis? What if we have a ton of assets that require a lot of bandwidth themselves? After all, we have about 3 seconds (5 if we are being optimistic), before a user leaves our website.
My preferred option is to use Preact, which is a really lightweight implementation of React. To make things easier, I will install preact-compat and preact-redux along with preact, so that we do not have to alter our code almost at all. Go ahead and install all of them. Then, find any references of react and react-dom and replace them with preact-compat. Finally, replace all references of react-redux with preact-redux and rebuild your project.
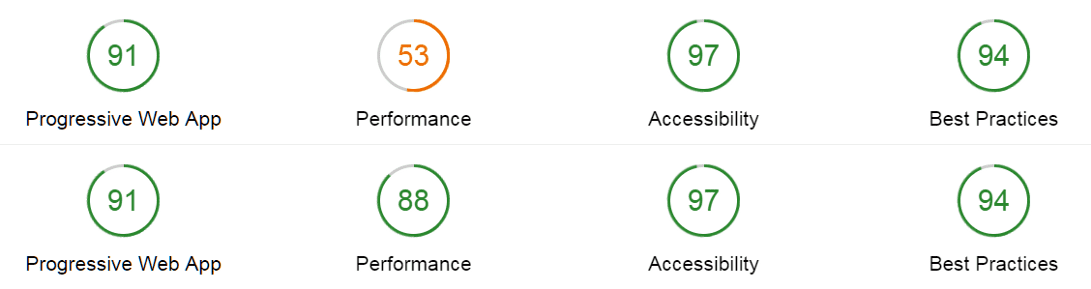
My .js file is now 77KB! This is less than half the previous size, which should speed up loading times quite a lot. But there’s more we can do. Testing my PWA in Lighthouse reveals that the images on the page take forever to load, so I need to fix that. One idea I had was to use the underestimated <picture> element to show a smaller, lower-definition image on mobile. Making this change, compiling and running again reveals that, while not perfect, the application’s performance is a lot better and that I trimmed off over 1 second of loading time.
TL;DR: The final size of the bundled Javascript file can be pretty large, slowing down initial load times for our PWA. Preact is a lightweight and easy-to-use alternative, which will help you minimize the size of your application.
Final considerations
Deploying the PWA, I noticed that Github Pages did not serve it correctly. This is due to the fact that all the paths in index.html point to /, instead of ./. If you are planning to deploy on Github Pages, I suggest running npm run eject, then modifying the getServedPath() in /config/paths.js to point to ./, instead of /. Rebuilding and deploying to Github Pages, my PWA runs as expected and the auto-generated service worker informs me that content is cached for offline use.
The final source code is available here and you can see the finished application in all its glory here.
Hopefully, by now you understand how Progressive Web Apps work and how to utilize all the modern tools to make your life easier. Thank you very much for your time!