


A Beginner’s Guide to Progressive Web Apps & the Frontend Web

Developing for the frontend web and keeping up with the Javascript ecosystem and all the new terms and flashy frameworks can be intimidating to say the least. I wanted to try and go over it as much as possible in a post for quite a while now and I have finally mustered the courage to do so. At the end of this post, I hope you will have learnt something new or honed your web development skills a little bit. Ironically, this post’s length and sheer amount of content can also be intimidating, but I strongly suggest you take the time to read at least the parts that interest you. Every section has a TL;DR at the very end, so you can quickly leaf through this, until you find something interesting.
RESTful APIs
The first thing I’m going to be covering is the concept of RESTful APIs. The term REST or RESTful API comes up a lot in most conversations among web developers and there’s a good reason for this. REST (REpresentational State Transfer) APIs and web services provide an easy way to communicate with a backend architecture without the need to understand or mess with the architecture itself.
To put it more simply, as a frontend developer, you are going to be interacting with one or more endpoints (i.e. URIs) that are part of an API that resides on a server, cluster or similar backend, that someone else has created for you. If the API is well-designed, you will be given clear and concise documentation on how to go about requesting, creating and editing resources on the backend (provided that you are properly authorized), without ever having to write code in PHP or touch the SQL database that resides on said backend.
RESTful APIs come in many shapes and forms, the most popular being ones that return JSON objects, which can be very easily manipulated with Javascript on the client-side, effectively allowing frontend developers to deal with just the View and Controller parts of the MVC (Model-View-Controller) pattern.
TL;DR: RESTful APIs are very popular and provide frontend developers with a way to communicate with resources on the web, effectivelly allowing them to focus on developing for the frontend, without worrying about the underlying architecture.
AJAX
AJAX (Asyncronous JavaScript And XML) has been around for years and every web developer has used it in one way or another (most of us through jQuery). I’m not going to go really in-depth on AJAX here, as there are literally hundreds of better resources online, but I want to take a minute to just admire the power it gives a frontend developer.
Using AJAX, we can request resources from one or more places online (or locally, if your page resides on the same server as your requested URI), anytime we want, without our web applications slowing down or needing to get all the data to start rendering. We can, in fact, avoid loading any content whatsoever on our page and then request it as soon as the empty HTML page has loaded. This, combined with the afforementioned RESTful APIs, allows for a great amount of flexibility, portability and maintainability in web applications.
TL;DR: AJAX is a very powerful tool that can be combined with RESTful APIs to create truly dynamic web applications that load fast and display content from resources on the web.
Getting content from the web
Creating your first web application can seem a bit difficult at first, so let’s take it one step at a time, starting with getting content from a RESTful API, using AJAX calls.
The first step is to find a high-quality API, preferrably one that outputs to JSON. Here are a few resources I found while searching online, that output placeholder content and that we can use to build a sample web application:
- JSON Placeholder — Placeholder text outputted in JSON format, covering many common use-cases. Very easy to get started with, perfect to populate a mockup web appplication such as the one we will be making.
- Unsplash It — Placeholder content is not complete without images and this is the definitive place to get them. The documentation is really clear and easy-to-follow, so you can get started in no-time.
- Random User Generator — Another high-quality resource, providing you with generated user profiles that can be custom-tailored to your needs. It allows for a plethora of options, but we will only need a select few in the course of this post.
We will be using these three, but feel free to check the list at the end of the post for more interesting APIs that you can use to generate placeholder content for your page.
So, the first thing you’ll want to do before you write any code is actually visit the endpoint of one of these and see what it is that you get. Let’s send a GET request to the Random User Generator, just by visiting it. What you’ll get should look similar to this:
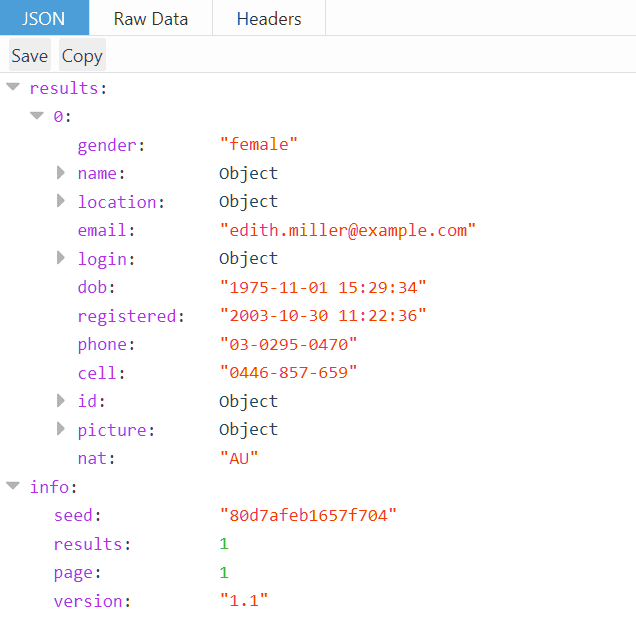
What you see in your browser and the image above is a JSON (JavaScript Object Notation) file, which should look familiar if you have ever used objects in Javascript. So, let’s request this same resource programmatically:
| // Send a 'GET' request to the specified url and run the callback function when it completes. | |
| function httpGetAsync(url, callback) { | |
| var xmlHttp = new XMLHttpRequest(); | |
| xmlHttp.onreadystatechange = function() { | |
| if (xmlHttp.readyState == 4 && xmlHttp.status == 200) | |
| callback(xmlHttp.responseText); | |
| }; | |
| xmlHttp.open('GET', url, true); | |
| xmlHttp.send(null); | |
| } |
The above snippet does exactly that and it only needs 10 lines (9 without the comment). The only thing that remains to be done now is to feed it a url matching our API endpoint and a function for the callback and we can see some content. Let’s try it out. Assuming you have created an empty HTML page and linked to the above Javascript code, just run this from your browser’s developer tools:
httpGetAsync(
  'https://randomuser.me/api/',
  function(e){console.log(e)}
);
What you should get is a similar result to the previous one, only now it’s wrapped in double quotes. Naturally, the result is a string. Even more naturally, we can convert it to a Javascript object, using JSON.parse() and then use it like it was meant to.
We just got some content from an API and printed it to the console. Before we move on, let’s explore this specific API a little bit more, so that we can better utilize it in the rest of this post.
Specifically, I would like to focus on the seed and results parameters, which we can embed to our url to get the same set of users every time. To add those, we simply need to add a ? after out url and then {parameter_name}={value}, separating multiple parameters using a &. I suppose this is common knowledge, but it’s probably worth mentioning. For this post, I will also be using the nationalities parameter to make sure no non-Latin characters appear in my HTML and make my life difficult. From here on out, my target endpoint for getting users will be this, allowing me to get the same 25 users for the rest of this post, all from the US.
TL;DR: To get started developing a web application, you must find a high-quality JSON API. Using 10 lines of Javascript code, you can easily request resources from a RESTful API that outputs random users and convert them to Javascript objects.
Presentation and the CSS framework conundrum
Having managed to grab some content from an API, we now have to render it for the user to see. However, dealing with CSS styles and selectors can be really messy, so most people resort to using a CSS framework. The popular choice seems to be Bootstrap, which is well-documented, has a nice, large community and is feature-rich. However, I will be using mini.css, which I developed myself and I know a lot better than Bootstrap. If you want to read more about it, I have written a few posts on how to get started with it and why it’s worth trying out.
The guidelines on how to use the framework’s classes and selectors only apply to mini.css, but with very little tweaking, they should work on Bootstrap as well (consider the web application’s presentation your homework as I will not be covering CSS in-depth here).
Before we can render anything on the screen, we should create an application shell. Nothing terribly fancy, apart from a navigation bar and a title for our application and maybe a footer. I’m going to be using the <header> element, which is pre-styled by mini.css, but feel free to tackle this problem any way you see fit. I will also add a .drawer to my navigation bar, which can be substituted with some buttons and, finally, a <footer> to make it all look nice and clean. Here’s what my application shell looks like:

I will be showing you my code in a little bit (after we add the user cards to it), but before we move forward let me tell you why it’s a good idea to use a CSS framework. Simply put, there are too many test cases for you to consider when building for the web and some device/OS/browser combinations are more quirky than others. A CSS framework deals with these quirks as it sees fit, while also providing you with a pretty good wireframe which can help you make responsive applications. Responsiveness is extremely important when developing with mobile devices in mind, so make sure you take the time to read up on it.
Supposing that we are happy with our application shell, let’s go ahead and render the data we got from the Random User Generator. I’m going to keep this simple and render each user’s image, name, username, email, location and birthday, but you can make this as complex as you like. Remember to access the .results key of your object after parsing the JSON data, as everything is wrapped in it. To make everything look pretty, I will be using the wonderful Feather icon pack, along with the .card class from mini.css and some neat CSS tricks.
Our web application is now dynamically populated with content that we rendered using Javascript and HTML. We have just created our first View, which is a fancy way of saying that we have created a visual representation of the data we requested from the API in the previous step.
TL;DR: Responsiveness and styling are very important for any web application, so it’s a good idea to use a CSS framework to create a simple application shell in HTML and then render the data we got from the API, using some Javascript.
Javascript Libraries
Our mockup web application works well so far, but the Javascript code, especially the renderUsers() method is a bit of a mess and seems very hard to maintain. Thankfully, there is a better way to do the same thing, using the tool all the cool kids use nowadays — React. For those of you who haven’t heard of it, it’s a very powerful Javascript library that makes rendering and updating a page significantly easier, while make your page faster using a virtual DOM and a technique known as diffing. I’m not going to explain those two in-depth, as you can find plenty of worthwhile resources around the web.
Converting our existing code to React isn’t all that difficult. In fact, all we have to do is move the loop outside the rendering process, so that we can extract a function that renders one user at a time and then, iterate over our users array and render each of them like before. There are several React-specific caveats here, such as the fact that our new function’s name must start with a capital letter, we must pass a single props argument to it and the list of elements has to be keyed. This might sound like a lot, but honestly it’s not too difficult to deal with.
React also allows for JSX, which essentially lets us write HTML inside Javascript without the need to wrap it in quotations. So, our existing code can be cleaned up a little bit. However, bear in mind that some conversions need to be made such as class to className, but you get used to those over time and the debug messages in the console are really great in helping you fix such issues.
I took the liberty of converting the three inline SVGs into their own functions as well, so now the whole of the rendering process should look like this:
| // Functional component for the mail icon. | |
| function SvgMail(props){ | |
| return <svg xmlns="http://www.w3.org/2000/svg" width="24" height="24" viewBox="0 0 24 24" fill="none" stroke="#424242" strokeWidth="2" strokeLinecap="round" strokeLinejoin="round"><path d="M4 4h16c1.1 0 2 .9 2 2v12c0 1.1-.9 2-2 2H4c-1.1 0-2-.9-2-2V6c0-1.1.9-2 2-2z"></path><polyline points="22,6 12,13 2,6"></polyline></svg>; | |
| } | |
| // Functional component for the calendar icon. | |
| function SvgCalendar(props){ | |
| return <svg xmlns="http://www.w3.org/2000/svg" width="24" height="24" viewBox="0 0 24 24" fill="none" stroke="#424242" strokeWidth="2" strokeLinecap="round" strokeLinejoin="round"><rect x="3" y="4" width="18" height="18" rx="2" ry="2"></rect><line x1="16" y1="2" x2="16" y2="6"></line><line x1="8" y1="2" x2="8" y2="6"></line><line x1="3" y1="10" x2="21" y2="10"></line></svg>; | |
| } | |
| // Functional component for the map pin icon. | |
| function SvgMapPin(props){ | |
| return <svg xmlns="http://www.w3.org/2000/svg" width="24" height="24" viewBox="0 0 24 24" fill="none" stroke="#424242" strokeWidth="2" strokeLinecap="round" strokeLinejoin="round"><path d="M21 10c0 7-9 13-9 13s-9-6-9-13a9 9 0 0 1 18 0z"></path><circle cx="12" cy="10" r="3"></circle></svg>; | |
| } | |
| // Functional component for the user card. | |
| function UserCard(props){ | |
| var user = props.user; | |
| return <div className="col-md-offset-1 col-lg-offset-2"> | |
| <div className="card fluid" id={"user_"+user.login.username}> | |
| <div className="section row"> | |
| <div className="col-sm-2 col-md-1"> | |
| <img src={user.picture.medium} alt={user.login.username} className="user-image" /> | |
| </div> | |
| <div className="col-sm"> | |
| <h4 className="user-name">{user.name.title} {user.name.first} {user.name.last} | |
| <small>{user.login.username}</small> | |
| </h4> | |
| </div> | |
| </div> | |
| <div className="section"> | |
| <p className="user-email"> <SvgMail /> {user.email}</p> | |
| </div> | |
| <div className="section"> | |
| <p className="user-birth"> <SvgCalendar /> {user.dob.split(" ")[0].split("-").reverse().join("/")}</p> | |
| </div> | |
| <div className="section"> | |
| <p className="user-location"> <SvgMapPin /> {user.location.city}, {user.location.state}</p> | |
| </div> | |
| </div> | |
| </div>; | |
| } | |
| // Renders a list of users as cards. | |
| function renderUsers(){ | |
| var userCards = users.map( | |
| function(user, key){ | |
| return <UserCard user={user} key={key}/>; | |
| } | |
| ); | |
| ReactDOM.render( <div>{userCards}</div> ,contentArea); | |
| } |
We just extracted a functional component out of our previous code, essentially making it a reusable entity. It’s worth taking a look at what happens under the hood, as Babel converts the HTML we provided to React.createElement() calls, making it look something like this:
| function SvgMapPin(props) { | |
| return React.createElement( | |
| 'svg', | |
| { xmlns: 'http://www.w3.org/2000/svg', width: '24', height: '24', viewBox: '0 0 24 24', fill: 'none', stroke: '#424242', strokeWidth: '2', strokeLinecap: 'round', strokeLinejoin: 'round' }, | |
| React.createElement('path', { d: 'M21 10c0 7-9 13-9 13s-9-6-9-13a9 9 0 0 1 18 0z' }), | |
| React.createElement('circle', { cx: '12', cy: '10', r: '3' }) | |
| ); | |
| } |
On a side note, if you want to get started with a lightweight version of React, without the need for JSX and some of the fancier and more complex stuff, I would strongly suggest checking Preact out, as it is a great alternative that can trim a second or two off of your loading times.
TL;DR: Converting unstructured HTML render calls to functional components using React is really simple and a lot more maintainable, while it gives the developer more control over their code and allows for reusability.
Adding a second view
Most web applications have more than just one view, so this is what we will be doing next. We will utilize the other two APIs we mentioned above, in order to create a second view that is dynamically populated and contains text and images that are new every time we reload the page. Assuming you were paying attention, you should be able to do this without a lot of guidance, but I’ll give you an outline:
- We will be sending GET requests to
https://jsonplaceholder.typicode.com/comments?postId={id}, which will allow us to get 5 segments of text at a time in JSON format, incrementing{id}as we go. - We will also be sending GET requests to
https://unsplash.it/800/800?image={id}, which will get us a specific image every time. We will be using some code to generate a random{id}for each image request. In my Codepen sample, I also added an array of invalid{id}values that I extracted from the API, so that no response comes back without an image. - After both requests are completed, we will be building a card for each post, randomly assigning a user from our list as the author and finally rendering using React.
- We also want to add a button that will switch between the two views, so we can still view the users list if we so desire. I will be adding this inside my drawer menu, but feel free to tweak this to your liking.
After carefully coding everything mentioned above and polishing it all up, you should end up with something that resembles a Singe Page Application (SPA):
TL;DR: Adding a second view and some interactive elements is all you need to make your mockup web application feel like a real web application.
Loading more content
If you’ve been spending any amount of time on the web lately, you will instantly spot exactly what’s missing from this web application: infinite scrolling. If you’re not familiar with the concept, it refers to loading more content as soon as the page is scrolled past a certain threshold in the vertical axis. In our example we will be setting our threshold to 80%, however you can tweak it to suit your needs and preferences. To do so, we will need a very simple method that calculates the scroll percentage of the page.
| // Get page scroll percentage. | |
| function getScrollPercent() { | |
| return ( | |
| (document.documentElement.scrollTop || document.body.scrollTop) | |
| / ( (document.documentElement.scrollHeight || document.body.scrollHeight) | |
| - document.documentElement.clientHeight) | |
| * 100); | |
| } |
The method presented above is very simple, accounts for all cases and returns a value in the [0,100] range (inclusive). By binding to the scroll and resize events of the window, we can reliably know when the user is about to reach the end of the page and load more content. Here’s what our web application looks like after infinite scrolling has been added to the posts view.
TL;DR: Infinite scrolling is a staple of any modern web application and is really easy to implement, enabling the dynamic loading of content when necessary.
Note: If you’re reading and following throughout the whole post, now would be a good time to take a 10-minute break, if you wish, and come back as the last few sections are quite complex and a little more demanding.
Web App Manifest
Before we can really say we’ve built a web application (let alone a progressive web app), we need to deal with the manifest.json file, which consists of our application’s name, short_name, icons and a bunch of other properties, providing information about our web application to the client’s browser. Before we get to mess with it, however, we need to get our web application up and running on localhost with the help of npm and React’s tips.
I’m assuming you’re somewhat familiar with the former and that the latter will not give you any trouble, so I will be moving forward with setting up a manifest for our web application. In my experience, you only need to fill in so many fields to create a working web application, so I suggest you head over to the Web App Manifest Generator and fill in the info you want. If you have the time to polish everything up with an icon, you can utilize the Favicon & App Icon Generator to make sure you web application has a nice icon to go with it.
After it’s all said and done, your manifest should look similar to this:
| { | |
| "name": "Mockup Progressive Web App", | |
| "short_name": "Mock PWA", | |
| "description": "A mock progressive web app built with React and mini.css.", | |
| "lang": "en-US", | |
| "start_url": "./index.html", | |
| "display": "standalone", | |
| "theme_color": "#1a237e", | |
| "icons": [ | |
| { | |
| "src": "\/android-icon-48x48.png", | |
| "sizes": "48x48", | |
| "type": "image\/png", | |
| "density": "1.0" | |
| }, | |
| { | |
| "src": "\/android-icon-72x72.png", | |
| "sizes": "72x72", | |
| "type": "image\/png", | |
| "density": "1.5" | |
| } | |
| ] | |
| } |
By creating a manifest, we are polishing up our web application and making it behave more like it should. This is only the beginning, though, on or web application’s way to become a progressive web app.
TL;DR: A manifest.json file is used to define certain properties for a web application, effectively paving the way for the creation of a progressive web app.
Service Workers
The last step on our way to build a progressive web app is to create a Service Worker. A Service Worker is one of the core requirements of a progressive web app and is what allows our web application to work offline to some extent. While they have been around for quite some time, the documentation on Service Workers feels a little bit too technical and complicated, but lately this is starting to change. If you really want to read more about progressive web apps and Service Workers, check the resources at the end of the post, as I’m sure you can find some useful links.
For the purposes of this post, we will be creating a Service Worker in its most basic form, allowing us to cache request responses and then serve them whenever they’re available. The first step is to create a service-worker.js file, which will serve as our Service Worker.
Before we can really make our Service Worker do anything useful, we need to understand the three core events we will be dealing with:
installis fired on the first load and is used to perform the initial setup of the Service Worker, such as setting up offline caches.activateis fired after the Service Worker is registered and has been successfully installed.fetchis fired whenever an AJAX request is sent over the network and can be used to serve cached resources (especially useful when offline).
The first thing we want to do during installation is utilize the CacheStorage Web API to create a cache for our web application and store any static content (such as icons, HTML, CSS and Javascript files) in it. This can be very easily done using the following syntax:
| // "caches" is a global read-only variable, which is an instance of CacheStorage | |
| caches.open(cacheName).then(function(cache) { | |
| // Do something with your cache | |
| }); | |
| // Source: https://developer.mozilla.org/en-US/docs/Web/API/CacheStorage/open |
We can quickly create a simple install event handler that caches our index.html, Javascript file and manifest.json, but before we do that we must specify a name for our cache. This allows us to separate versions of the same files or the data from the app shell. We won’t go into detail about caches here, but you can find resources at the end of the post about them, if you are interested. Apart from defining a name for our cache, we should specify which files should be cached, using an array. Let’s see what our install handler looks like:
| var cacheName = 'mockApp-v1.0.0'; | |
| var filesToCache = [ | |
| './', | |
| './index.html', | |
| './manifest.json', | |
| './static/js/bundle.js' | |
| ]; | |
| self.addEventListener('install', function(e) { | |
| e.waitUntil(caches.open(cacheName) | |
| .then(function(cache) { | |
| return cache.addAll(filesToCache) | |
| .then(function() { | |
| self.skipWaiting(); | |
| }); | |
| })); | |
| }); |
In under 20 lines we made our web application utilize the cache for its resources. Let me clarify just one thing, though. The ./static/js/bundle.js file is what our Javascript code gets compiled into during development. This is one of the quirks of our development/production environment and we will be dealing with this in the next step.
The activate handler is also quite simple, its main purpose being to update the cached files whenever something in our application shell changes. If we want to update any files, however, we will have to change the cacheName (preferrably in a SemVer-compliant manner). Finally, the fetch handler will check if the requested resource is stored in the cache. If the resource is found, it will serve it from the cache, otherwise it will request it as usual and store the response in the cache, so that it can be reused in the future. Putting everything together, you should have something similar to the code below for these two handlers:
| self.addEventListener('activate', function(e) { | |
| e.waitUntil(caches.keys() | |
| .then(function(keyList) { | |
| return Promise.all(keyList.map(function(key) { | |
| if (key !== cacheName) | |
| return caches.delete(key); | |
| })); | |
| })); | |
| return self.clients.claim(); | |
| }); | |
| self.addEventListener('fetch', function(e) { | |
| e.respondWith(caches.match(e.request) | |
| .then(function(response) { | |
| return response || fetch(e.request) | |
| .then(function (resp){ | |
| return caches.open(cacheName) | |
| .then(function(cache){ | |
| cache.put(e.request, resp.clone()); | |
| return resp; | |
| }) | |
| }).catch(function(event){ | |
| console.log('Error fetching data!'); | |
| }) | |
| }) | |
| ); | |
| }); |
We have built our Service Worker, but we need to actually register it from inside our web application to be able to benefit from its functionality. We just need to add a few lines of code in our main Javascript file and we’re ready to turn our web application into a progressive web app:
| if ('serviceWorker' in navigator) { | |
| navigator.serviceWorker | |
| .register('./service-worker.js') | |
| .then(function() { console.log('Registered service worker!'); }); | |
| } |
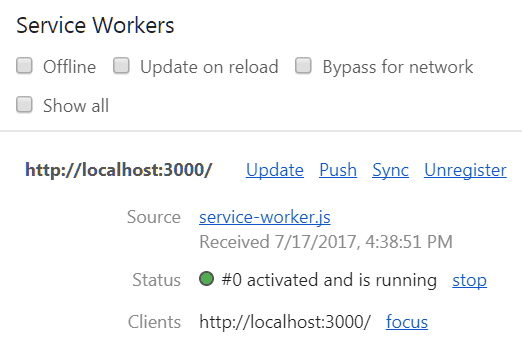
After setting all of this up, you should open the Application pane on your Chrome Dev Tools and see if everything works as expected. You should see a Service Worker properly registered, activated and running. If you scroll for a bit, then tick the Offline checkbox in the Chrome Dev Tools and refresh, you will be served an offline version of your page that uses cached resources.
We have just turned our web application into a progressive web app, however we are still in development. The final step before we are ready to share it with the world is to build it for production.
TL;DR: Service Workers allow web applications to set up caches and utilize them to load resources without using the network, essentially turning a web application into a progressive web app.
Bundling for production
Everything we’ve done so far works great while hosted on localhost, but inspecting the production files after a quick npm run build reveals a whole host of errors that we need to resolve. First and foremost, many of our files are not properly linked to, from our HTML page. To deal with this, we need to add a single line to our package.json, like so:
"homepage" : "."
After rebuilding and opening our HTML page in the browser, we can see that it mostly works. Adding this line with the "homepage" property, we told the build script to change all the paths in reference to ., meaning that they are now relative paths.
The next problem we have is that our Service Worker points to the wrong Javascript files, as there is no static/js/bundle.js anymore. If we look closely at the build files, we will realize that our Javascript has been converted to a main.{hash}.js file, where the {hash} part is different in each build. What we want is a file named main.js, so that we can load it from our Service Worker. Thus, we need to rename the file, which will in turn break the references inside our index.html, which we definitely don’t want. To fix both of these problems we will have to use some build tools from the npm registry, namely renamer and replace. We also want to minify our service-worker.js, as it is not compressed by default, due to the fact that it is part of our public folder, so we should go ahead and grab uglify-js, too.
npm install --save-dev renamer
npm install --save-dev replace
npm install --save-dev uglify-js
Three simple commands and we got the tools we need. Now to put them to good use. Again, this should be reasonably easy after glancing at the documentation of the tools, so I’ll go ahead and show you what the "scripts" property of my package.json looks like after creating all the necessary scripts.
| "scripts": { | |
| "start": "react-scripts start", | |
| "build": "react-scripts build && npm run build-rename-replace && npm run build-sw", | |
| "test": "react-scripts test --env=jsdom", | |
| "eject": "react-scripts eject", | |
| "build-sw" : "npm run build-replace-sw-refs && npm run build-minify-sw", | |
| "build-rename-replace": "npm run build-rename && npm run build-replace", | |
| "build-rename": "npm run build-rename-js && npm run build-rename-css", | |
| "build-rename-js": "renamer --regex --find main\\.\\w+\\.js --replace main.js build/static/js/*.js", | |
| "build-rename-css": "renamer --regex --find main\\.\\w+\\.css --replace main.css build/static/css/*.css", | |
| "build-replace": "npm run build-replace-js && npm run build-replace-css", | |
| "build-replace-js": "replace main\\.\\w+\\.js main.js build/index.html", | |
| "build-replace-css": "replace main\\.\\w+\\.css main.css build/index.html", | |
| "build-replace-sw-refs": "replace './static/js/bundle.js' './static/js/main.js','./static/css/main.css' build/service-worker.js", | |
| "build-minify-sw" : "uglifyjs build/service-worker.js --output build/service-worker.js" | |
| } |
Let’s go ahead and explain what everything does:
build-renameruns two scripts, each replacing the names of the Javascript and CSS files that were produced with the desired names (main.jsandmain.cssrespectively).build-replaceruns two scripts that replace the references to the Javascript and CSS files with their renamed versions.build-rename-replacebundles the previous two in one command.build-swupdates the Service Worker’s reference tostatic/js/bundle.js, now pointing to the newmain.jsfile and it also adds a reference tomain.cssfor good measure. After that, it minifies the Service Worker.- Finally,
buildbundles all of the above together, along with our default build process, so that whatever ends up in thebuildfolder is now ready to publish on a website.
Running npm run build should now produce a production-ready version of our progressive web app, which we can now host anywhere, by simply copying the files inside the build folder.
TL;DR: Building a web application for production presents interesting problems, that require the use of build tools and scripts to be resolved. In our case, simply updating names and references does the trick.
Final steps
It’s been a long, winding road, but our web application is finally a production-ready progressive web app. The final step before sharing it with the world on something like Github Pages, would be to assess its quality, using Lighthouse, a tool that help us evaluate our web applications and deal with problems.
After running it on my development build on localhost, I found a few things that needed fixing, such as images not having alt attributes, external links not having the rel="noopener" attribute and my web application missing a landmark region, which was easily fixable, using the <main> HTML tag. Having fixed everything I could, here are my Lighthouse scores:
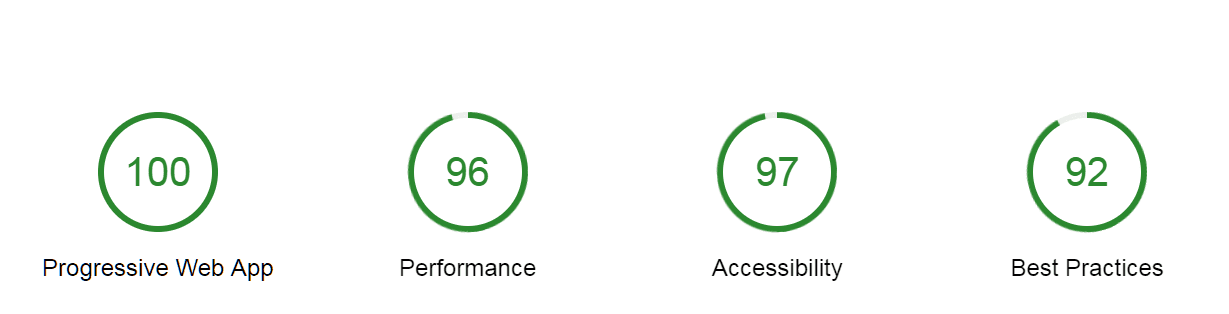
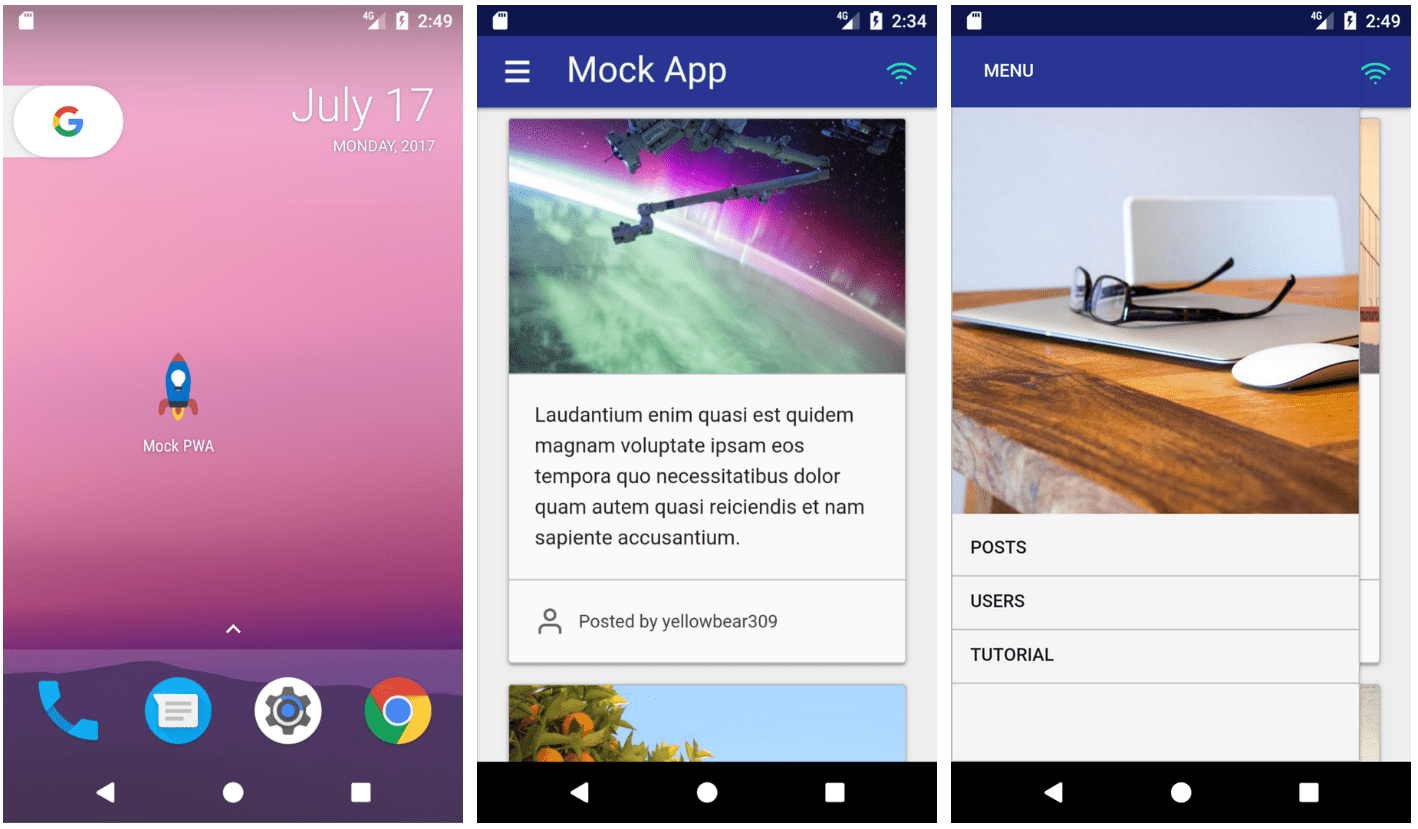
As you can see, it’s very well-optimized and it qualifies as a progressive web app. I can now proudly publish it on Github Pages. Here’s a link to the finished web application itself and here’s a link to the source code repository on Github. I took the liberty of adding Online/Offline indicators, as well, but you can skip those or just check out my code. Now, I can finally install it on my phone and show it off to my friends!
TL;DR: Before a web application is ready to be released, it’s worthwhile testing its quality with Lighthouse and optimizing it as much as possible.
This is all, from zero to progressive web app. I hope that you’ve learnt something along the way. Thank you very much for your time!
Resources
- MDN’s Getting started with AJAX is a great starting point, if you are interested in learning more about AJAX and how to use it in your web applications.
- As far as JSON APIs are concerned, here’s a few more that might interest you:
UI Names— Another resource for generating random users with lots of customization to suit your needs.
Robohash — Generates robot avatars from a given string, useful for creating user profiles or for placeholder images.
Adorable Avatars — Generates funny-looking avatars from a given string, a little less varied that Robohash, but it does the trick. - Out of the vast CSS framework ecosystem, Bootstrap, Semantic UI, Bulma and Foundation seem to be pretty popular. I also suggest my own alternative, mini.css, in case you want to use something a little bit lighter.
- For UI icons, FontAwesome is usually the definitive choice, but I personally recommend Feather, which is lighter and more minimalistic.
- If you want to know more about diffing and the virtual DOM, I would strongly suggest that you take the time to read this article.
- Out of all the modern Javascript libraries, React is by far the most popular, but there is some value in Preact and VueJS, so you might want to check those out.
- Web Application Manifests are well documented on both MDN and Google Developers. Remember that you can also use the Web App Manifest Generator, if you want to easily and quickly generate a manifest.json for you web application.
- On the topic of Service Workers and Progressive Web Apps, I would strongly recommend that you take the time to build your first progressive web app, as outlined here or here. You should also be looking at the Service Worker’s lifecycle and, if you want to delve a little bit deeper, you might want to read Indicating Offline(which I used myself to build the Online/Offline indicators for this post’s progressive web app) and Offline Recipes for Service Workers.
- In regards to caching and the CacheStorage Web API, I recommend reading this article, as well as keeping the MDN documentation nearby at all times.
- If you want to evaluate your web application and fix problems with it, you should be using Lighthouse and the Mobile Speed Test by Google.
- Finally, you should check this post’s source code and live demo on Github.